


Support: Documentation - Drawing Frames
Developing a frame consists of extruding profiles, which are to be joined in one structure.
How to draw a profile
Use the Extrude button to extrude a profile on the drawing surface. Do it as follows:
- Click the button to enable the Extrude tool
- Click on the drawing surface, to select a base point for the profile
- Extrude the profile by dragging it in a vertical or horizontal plane, and finish the extruding by clicking where you would like the profile to end.
While extruding, Frame Designer displays the height value that you have reached for the profile.
While drawing a profile, Frame Designer helps you to place it by use of snapping, i.e. highlighting the drawing surface lines, base points, and intersection planes for the profile.
How to select an object
Use the Select button to select an object on the drawing surface. Do it as follows:
- Click the Select button to enable a selecting tool (the Select button is highlighted)
- Select an object using a click (the selected object is highlighted in carrot-red).
You can select several objects at once by holding down the left button of the mouse at any point of the drawing surface, dragging it over the objects you would like to select, and dropping the mouse button.
You can select several objects by clicking the objects one by one while the Shift key is pressed. To select all the objects on the drawing surface choose Edit > Select All in the main menu.
How to copy an object
Use the Copy button to copy an object on the drawing surface.
The Copy button copies a currently selected object (see «How to select an object») onto the clipboard and leaves it selected in the current location. Once you have copied an object, you can paste it anywhere on the drawing surface.
Use the Copy option as follows:
- Click the Select button to enable a selecting tool (the Select button is highlighted)
- Select an object that you would like to copy on the drawing surface (see «How to select an object»)
- Click the Copy button
- Now you can paste it anywhere on the drawing surface (see «How to paste an object»).
If you would like to copy several objects, at Step 2, select the objects (see «How to select an object») and follow Steps 3–4.
Each time you use the Copy button, the clipboard is overwritten and the previous selection is lost.
How to cut an object
Use the Cut button to delete an object from a current location and place it anywhere on the drawing surface.
The Cut button copies a currently selected object (see «») onto the clipboard and removes it from the current location. Once cut, an object can be pasted anywhere on the drawing surface.
Use the Cut option as follows:
- Click the Select button to enable a selecting tool (the Select button is highlighted)
- Select an object that you would like to cut (see «How to select an object»)
- Click the Cut button
- Now you can paste it anywhere on the drawing surface (see «How to paste an object»).
If you would like to cut several objects, at Step 2, select the objects (see «How to select an object») and follow Steps 3–4.
Each time you use the Cut button, the clipboard is overwritten and the previous selection is lost.
How to paste an object
Use the Paste button to place a last copied or cut object on the drawing surface.
The Paste button inserts an object from the clipboard onto the drawing surface at a current location of the cursor. The object remains on the clipboard to allow multiple copies of it to be placed on the drawing surface and is only removed from it when a new object is cut or copied onto the clipboard.
Use the Paste option as follows: Click the Paste button and place the object on the drawing surface.
How to delete an object
Use the Delete button to remove an object, which you have drawn previously. Do it as follows:
- Click the Select button to enable a selecting tool (the Select button is highlighted)
- Select an object(-s) that you would like to delete from the drawing surface (see «How to select an object»)
- Click the Delete button to delete the object.
If you would like to delete several objects at once, at Step 2, select the objects (see «How to select an object») and follow Step 3.
How to edit length of an object
Use the Edit length button to edit length of an object on the drawing surface. Do it as follows:
- Click the Select button to enable a selecting tool (the Select button is highlighted)
- Select an object that you would like to resize (see «How to select an object»)
- Click the Edit length button to enable the tool.
- Point one of the green arrows to resize the object (the arrow is highlighted in blue)
- Drag and drop the arrow until it reaches a desired length.
How to rotate an object
Use the Rotate button to rotate an object on the drawing surface. Do it as follows:
- Click the Select button to enable a selecting tool (the Select button is highlighted)
- Select an object that you would like to rotate (see «How to select an object»)
- Click the Rotate button to enable the tool.
- Click on the object to rotate it 90 degrees about its axis counterclockwise.
- Repeat Step 4 as many times as you wish.
How to move an object
Use the Select button to move an object on the drawing surface. Do it as follows:
- Click the button to enable the Select tool (the button is highlighted)
- Select the object that you would like to move (see «How to select an object»)
- Point one of the green arrows to move the object in the direction of the arrow (the arrow is highlighted in blue)
- Drag and drop the object where you would like to place it.
If you would like to move several objects, at Step 2, select the objects (see «How to select an object») and follow Steps 3–4.
How to draw a joining segment
Use the Segment button to draw a joining segment between two profiles on the same plane.
In order to use the Segment tool, you must have two objects located in the same horizontal or vertical plane and at right angles to each other.
To draw a joining segment, do as follows:
- Click the button to enable the Segment tool
- Place the cursor over one of the profiles at the point where you would like to draw the joining segment.
- Click to draw the joining segment.
Frame Designer zooms the view in order that you can better see the joining point and displays the profile length remaining before and after the joining point.
Note that joining segments can join profiles only parallel to drawing surface lines.
How to join profiles in plane
Use the Draw in plane button to draw joining segments between profiles located in the same horizontal plane and at right angles to each other.
To draw joining segments, do as follows:
- Click the button to enable the Draw in plane tool.
- Place the cursor over one of the profiles at the point where you would like to draw the joining segment.
- Click to draw the joining segment.
- Follow Steps 2–3 to draw the rest joining segments.
Frame Designer zooms the view in order that you can better see the joining point and displays the profile length remaining before and after the joining point.
Frame Designer draws the joining segment and highlights the snap plane for all profiles that can be joined.
To join the profiles horizontally at a different height, enable the Draw in plane button again and repeat Steps 2–4.
Note that horizontal segments can join profiles only parallel to drawing surface lines.
How to place cover caps
Use the Covers button to place cover caps to objects on the drawing surface.
The Covers button places a roller to a currently selected object (see «How to select an object»).
Use the Covers tool as follows:
- Click the Select button to enable a selecting tool (the Select button is highlighted)
- Select an object(-s) that you would like to place cover caps for (see «How to select an object»)
- Click the Covers button.
How to place rollers
Use the Rollers button to place rollers to objects on the drawing surface.
The Rollers button places a roller to a currently selected object (see «How to select an object»).
Use the Rollers tool as follows:
- Click the Select button to enable a selecting tool (the Select button is highlighted)
- Select an object(-s) that you would like to place roller(-s) for (see «How to select an object»)
- Click the Rollers button.
How to use a snap feature
The snap feature helps you to place objects on the drawing surface in many ways.
Use the Snap to Grid tool to restrict the movement of the cursor to intervals. Do it as follows:
- Click the Snap to Grid button.
- Select a required grid snap parameter for cursor navigation.
Use the Snap to Planes tool to highlight the profile length equal to the length of the other profile(-s) and sides of the profiles that are in the intersection plane.
- Enable the tool by a click.
- Extrude a profile. While drawing the profile, Frame Designer highlights the profile length (height) which is equal to the length (height) of the other profile as well as sides of the profiles that are in the same plane with an endpoint of an extruding profile.
Use the Snap to End tool to make the cursor to adhere or "snap" to the base-profile edges while drawing a new profile. Do it as follows:
- Enable the tool by a click.
- Set a base point along the edges of a base profile while extruding a new one. Frame Designer lets you set a base point only in the edges of the profile.
Use the Snap to Parallels tool to see the distance between the nearest profiles. Do it as follows:
- Enable the tool by a click.
- Highlight an endpoint of a profile. The Snap to Parallels tool displays the distance to the nearest profile.
Or
- Enable the tool by a click.
- Select a profile. The Snap to Parallels tool displays the distance to the nearest profile(-s).
Use the Snap to Parallels tool to place a profile at a certain distance from the nearest profile(-s). Do it as follows:
- Enable the tool by a click.
- Follow the drawing surface with the cursor. The Snap to Parallels tool displays the distance to the nearest profile.
- Select a base point for a new profile and click on the drawing surface to draw it.
How to save a frame
You can save a frame locally on your computer and load it next time you need it again.
To save a frame, do as follows:
- Choose File > Save.
- Specify the file name for the frame and click Save.
Frame Designer save the frames in .scene format.
How to Send Feedback
You can send feedback about Frame Designer.
Choose Help > Send Feedback from the main menu. Frame Designer displays Feedback Form.
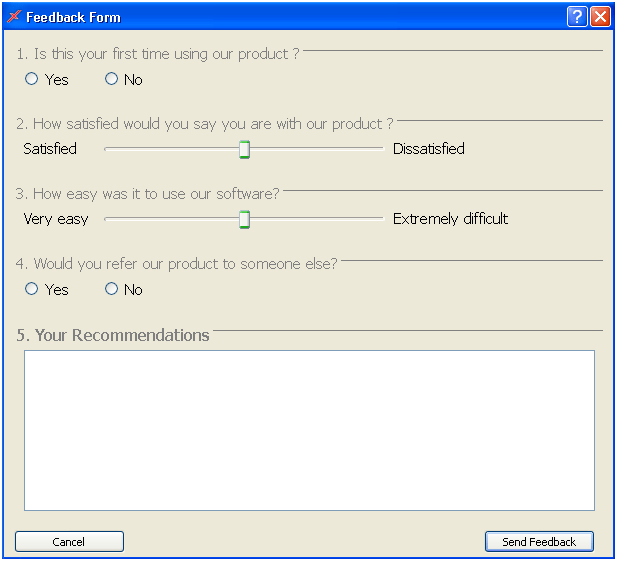
Answer the suggested questions using the radio buttons and sliders, specify your comments and click Send Feedback. To cancel sending the feedback and close the window, click Cancel.